Monday, January 19, 2009
Find of the Week
Check out this site to make your own image in the style inspired by the famous poster of (now President) Obama (designed by Shepard Fairey). Here's a quick one I just did - it would work even better if you get a close-up portrait and make a transparent background. If you create any, please share the permalink in the comments - I'd love to see them!
And a poster is only $13.95! You can also make t-shirts, mugs, etc. of your image.
http://obamiconme.pastemagazine.com/
Reduce, Reuse, Recyle
Party Ideas for the economic downturn . . .
Well, we're all tightening our belts these days but we still want to have fun! So instead of going out to dinner yet again to catchup with friends, I decided to host a Book Exchange party. The bonus being you get to hang out with friends AND go home with a few (new to you) books. So here's how we did it:
Each guest was instructed to bring two books that she enjoyed and was now ready to pass along. We spread them all out on a table (a train table of course - but a regular table will do just fine if you're not surrounded by kid's toys in your home). I provided post-its and pens and had each guest take five post-it's, numbered 1-5 and put their name on each and then place on their top five book choices.
Later in the evening after everyone had chosen we checked out the books. Some were easy, only one #1 was on a book so that person would automatically get it. However, if there were more than one #1 or no number ones but a few #2's, etc. I decided those people should fight it out. This works best later in the evening when most are good and liquored. We decided that each person would tell a story and the group would vote for the best one. We started out with "most embarassing moment" stories. That in itself was worth it and long after the book choosing was over more stories were flowing. I also gave a small bag of books to the person who brought the book with the most post-its on it. All in all we had a great time and I'm excited to read my new books.
I'm hoping someone else hosts soon in the future to get a whole new pool of books going. I'm thinking of doing a toy exchange next. Basically, any excuse to get together with adult drinks and no children is as Martha would say, "a good thing" a damn good thing!
Wednesday, January 14, 2009
(Mostly) Wordless Wednesday
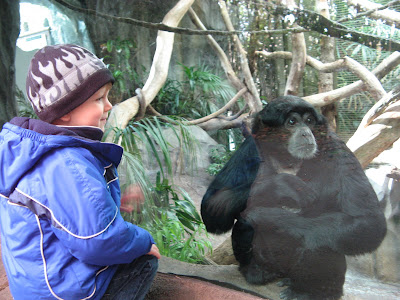
Monkey with a monkey - well, technically a Siamang which is a gibbon (lesser primate) and not a monkey!
For more Wordless Wednesday check out 5minutesformom.com.
Monday, January 12, 2009
Photojojo
I found a new site that I love and I thought I'd share. It's Photojojo and it's all about great things you can do with your photos or as they say,
"We find the best photo shiz anywhere"
They've got photography tips, DIY projects (like this awesome calendar above) and great products too. Check it out and sign up for their newsletter. I may not do any of these projects anytime soon but I like the thought of them . . . and the possibilities!
I will be buying the fotoclips used in this project and plan to use them to create some art to fill up the walls in the family room or Monkey's room. I might as well start putting up all these pix I take of the boy!
Here are some other fun products - the Doodle Frame and DIY Photo Block Kit:
Saturday, January 10, 2009
Sleep . . . wonderful sleep!
A friend (thanks Bridget) recommended this product to me and I just ordered it from Amazon so (hopefully) it will be in my hot little hands by the end of the month. It is supposed to help your child learn to tell time but the BEST part is that you can set it with the super secret parent controls to glow green when it's time for kiddo to come out of his room.
I will let you know if it helps keep Monster - errr I mean Monkey - in his room! One can only hope.
Wednesday, January 7, 2009
Monsters Monsters Everywhere
Monsters are big in Monkey's life right now. He asks if there are monsters in the darkened living room, under his chair before he puts his feet down, he pretends he's a monster, he wants me to pretend I'm a monster, he has Dad pretend with him to be monsters and attack Mom with tickles, he wants the lamp on in his room so he can make sure there are no "big bad wolves" or monsters . . . It's basically 24/7 monsters around here.
Well, after fighting the "you need to go potty before we get in the car" battle every freakin' day - I decided to use monsters to my advantage. If you are in a public bathroom and hear the following exchange in the stall next to you - it's me and Monkey:
Mom (in a puny, squeaky monster voice - think Mr. Bill): "Oh no, don't get me . . . noooo!"
Monkey laughing (peeing in bowl): "I got you!!"
Monkey ordering me: "say, don't flush me!"
Mom: "NOOOOoooooo Don't flush me - noooo! whatever you do - ahhhh!"
Monkey (giggling): flushing the toilet then yelling (so very loudly), "You are going down to the SEWAGE PLANT!!!"
Yep, that's how we roll in the Monkey house.
Rosebud!
(Mostly) Wordless Wednesday
Nothing beats your first toboggan!
For more Wordless Wednesday check out 5minutesformom.com or Wordless Wednesday.
Tuesday, January 6, 2009
Thank you Thank you!
Thank you notes . . . this year I wanted Monkey to be a bit more involved. I had grand plans of him painting or drawing a picture for each one, etc. but unfortunately, Monkey's artistic output is neither on demand nor as prolific as his presents this year! But as Tim Gunn says, "Make it work!"
As you know, I love Kids Craft Weekly (KCW), so I borrowed her idea of making collages with glitter glue and then took the few pictures he did make, chopped them up and was able to make a bunch of notecards.
Just do it:
First you'll need to get your kid to make some art. Follow the directions above at KCW for the glitter glue pix (#2 Christmas Colors). I actually only used four of the sheets pictured below (decided to keep the yellow one whole for the art wall) and made 10 notecards with enough leftover I could have made a few more.
Hints and Warnings: This can be messy and you need to do some prep to make the glue and cut out a bunch of "stuff" to use for gluing. You might want to do all the prep away from the kiddos as Monkey went a little overboard in adding glitter & food coloring. Some batches were pretty solid (more glitter than glue with my glitter boy at the wheel) and made for some THICK pictures. He really enjoyed painting with the glue more than using it to glue stuff down too. I think I'll just mix glitter with tempera next time or just use the glue sans collage items. If your child is a color mixer (like mine) stick to one color of glue and you'll get more usable output. Red + Green = Brown. Normally I don't mind - it's all about the process and not the actual art - but since you're trying to put something cute on paper for relatives & friends . . . you aren't really looking for brown glitter smears!
Fast and easy - just get the paints, markers, crayons or dots (which I love) and have your kid go crazy on a few pages. The art work can be sparse and the cards will still turn out well (just use the most colored on portion).
Personally, I would do the next few steps alone if you have a younger child just for you sanity :) but they could help glue if you are more patient than I am!
Take an 8 1/2" x 11" piece of cardstock and cut in half to make two 5 1/2" by 4 1/4" cards. This is my favorite size card because you can make two out of one sheet of paper with no waste and they're not too huge to fill with writing! You can get envelopes (A2) at any paper store to fit. You can also just get a pack of pre-cut cards if you don't want to bother with cutting. You can also just use plain construction paper if you don't have cardstock lying around.
Then trim your child's artwork to approximately 4" x 5". At this point pick the parts that are most pleasing and chop away.
Affix to the front of the card with any type of adhesive. I used YES! paste just because Monkey went crazy with the glitter in a lot of spots so I knew double-stick tape or my favorite Tombo adhesive probably wouldn't make it through the mail.
For more kid "thank you" inclusion I like to have a conversation with Monkey about each gift. Sometimes I'll write the conversation verbatim on the card or I'll add what he said when he first opened it if it's a gem. For instance, when opening a construction loader from Aunt Lexy he said, "Oh!!" then paused (with appropriate reverence) and said, "It's bea-uuuutiful!"
Super Saxoflute conversation:
Mom: Why do you like it?
Monkey: Because it's beautiful! and fun!
Mom: Why is it fun?
Monkey: Because I love it - that's why I love it!!! Let's play marching band!
Mom: If Kevin was here what would you tell him?
Monkey: When he comes here I will say Thank you. When do I see him??
This project would also make a great set of notecards to give to a grandparent.
As you know, I love Kids Craft Weekly (KCW), so I borrowed her idea of making collages with glitter glue and then took the few pictures he did make, chopped them up and was able to make a bunch of notecards.
Just do it:
First you'll need to get your kid to make some art. Follow the directions above at KCW for the glitter glue pix (#2 Christmas Colors). I actually only used four of the sheets pictured below (decided to keep the yellow one whole for the art wall) and made 10 notecards with enough leftover I could have made a few more.
Hints and Warnings: This can be messy and you need to do some prep to make the glue and cut out a bunch of "stuff" to use for gluing. You might want to do all the prep away from the kiddos as Monkey went a little overboard in adding glitter & food coloring. Some batches were pretty solid (more glitter than glue with my glitter boy at the wheel) and made for some THICK pictures. He really enjoyed painting with the glue more than using it to glue stuff down too. I think I'll just mix glitter with tempera next time or just use the glue sans collage items. If your child is a color mixer (like mine) stick to one color of glue and you'll get more usable output. Red + Green = Brown. Normally I don't mind - it's all about the process and not the actual art - but since you're trying to put something cute on paper for relatives & friends . . . you aren't really looking for brown glitter smears!
Fast and easy - just get the paints, markers, crayons or dots (which I love) and have your kid go crazy on a few pages. The art work can be sparse and the cards will still turn out well (just use the most colored on portion).
Personally, I would do the next few steps alone if you have a younger child just for you sanity :) but they could help glue if you are more patient than I am!
Take an 8 1/2" x 11" piece of cardstock and cut in half to make two 5 1/2" by 4 1/4" cards. This is my favorite size card because you can make two out of one sheet of paper with no waste and they're not too huge to fill with writing! You can get envelopes (A2) at any paper store to fit. You can also just get a pack of pre-cut cards if you don't want to bother with cutting. You can also just use plain construction paper if you don't have cardstock lying around.
Then trim your child's artwork to approximately 4" x 5". At this point pick the parts that are most pleasing and chop away.
Affix to the front of the card with any type of adhesive. I used YES! paste just because Monkey went crazy with the glitter in a lot of spots so I knew double-stick tape or my favorite Tombo adhesive probably wouldn't make it through the mail.
For more kid "thank you" inclusion I like to have a conversation with Monkey about each gift. Sometimes I'll write the conversation verbatim on the card or I'll add what he said when he first opened it if it's a gem. For instance, when opening a construction loader from Aunt Lexy he said, "Oh!!" then paused (with appropriate reverence) and said, "It's bea-uuuutiful!"
Super Saxoflute conversation:
Mom: Why do you like it?
Monkey: Because it's beautiful! and fun!
Mom: Why is it fun?
Monkey: Because I love it - that's why I love it!!! Let's play marching band!
Mom: If Kevin was here what would you tell him?
Monkey: When he comes here I will say Thank you. When do I see him??
This project would also make a great set of notecards to give to a grandparent.
Monday, January 5, 2009
Santa Photos
I know, the holidays are over - but I've been behind on the blog (and life) and I wanted to share an easy way to display Santa photos. My Aunt has a huge display beginning from my first cousin's birth to now where the spouses and grand kids are included. I love looking at it each Christmas and vowed to start my own with Monkey. It's a great way to see the changes and a great way to make your Christmas decor personal. Here's a quick and easy way to display:
Items you'll need:
Length of Decorative Ribbon (at least 2 inches wide - mine is thicker but I think it would look great with a plain 2 inch red or gold, etc. ribbon) - Length depends on how many photos you have - you'll need enough at the top to hang and however much you want at the bottom.
Velcro Sticky-Back Tape - you can get this in a roll or strips. Just cut to fit your ribbon.
Picture Nail (optional) - you can hang from anywhere - even a curtain rod or mirror, etc.
Decorative Fluff (optional) - feel free to put some greenery at the top or bottom or a bauble - go crazy or keep it simple
Arrange your pictures in order by year (I mark on the back each year before putting away) - not important now since I only have four but later I'm sure it will be! Cut piece of velcro and apply the fuzzy piece to your picture and the nubby piece to the spot on the ribbon you want it to hang. Leave enough at the top of the ribbon for hanging. I didn't have much ribbon this year and I was in a hurry but I would suggest doing a bow at the top - maybe add a sprig of holly - or something like that. I went quick and dirty this year and just looped it on a nail and hung a gold star from the same nail. I would also have a bit more ribbon showing between pictures.
If you don't have velcro (but really, you have over 300 days to do this project so no excuses!) you can use regular tape but use enough so the pictures don't keep falling off the ribbon in the night (not that that has ever happened to me . . .) I like using the velcro because then when you store them you won't have any sticky residue mucking up the pictures.
Eventually, I may frame the pictures when there are enough - but right now I like the ribbon and I don't need a lot of space to display. Once your pictures fill up a ribbon - just cut a longer piece or start a new one. Or change ribbon to your mood.
Look how Monkey has changed: He goes from happy baby (oblivious really), to hysterical, to nervous (tongue sticking out) and back to happy (but still won't sit on his lap - and I don't blame him!)
Saturday, January 3, 2009
The Great Fight
Since it is a New Year and we all strive to be better when the calendar rolls around . . . I thought I'd share one of my favorite stories. I've had it on my office wall for many years and look to it often. Enjoy and Happy New Year!
An old Cherokee is teaching his grandson about life.
"A fight is going on inside me," the old man said to the boy. "It is a terrible fight and it is between two wolves. One is evil - he is anger, envy, sorrow, regret, greed, arrogance, self-pity, guilt, resentment, inferiority, lies, false pride, superiority and ego.
The other is good - he is joy, peace, love, hope, serenity, humility, kindness, benevolence, empathy, generosity, truth, compassion and faith. This same fight is going on inside you - and inside every other person too."
The grandson thought about it for a minute and then asked his grandfather, "Which wolf will win?"
Hi grandfather replied simply, "The one you feed."
Friday, January 2, 2009
Me Loves Chocolate
Okay, one of my New Year's resolutions is to start blogging again . . . next week!
Apparently, "stop procrastinating" is not one of them. In the meantime, here is my latest pick Claudio Corallo Chocolate on Seattle Picks.
Subscribe to:
Posts (Atom)